[Download the full Xcode project from GitHub.]
Today, I’m going answer all the questions I posed in this series of posts entitled “Basic animation, Auto Layout, and view geometry – Part X” (see parts 1, 2, 3, and 4). I’ll help you understand how how I created the following iPhone animation using Swift 3.0 — and/or how to get started with your first iOS app:
By helping you understand a simple block animation, I will have introduced you to the wild world of iOS development. Now you see the method to my madness. By picking a single, focused task, fleshing it out from many angles, I have created a series of tutorials that would help any new/aspiring iOS app developers get started in an exciting, creative, and potentially financially rewarding profession — and I included all the Swift 3.0 source code, storyboard, and Auto Layout constraints. Download the full Xcode project from GitHub.
OK, let’s go over the iOS concepts I asked you to define in previous series posts (1, 2, 3, and 4). You absolutely must know about these fundamental constructs to become a great iOS developer. I’ll define the concepts right after we review them, one by one:
- UIView bounds,
- UIView frames,
- UIView geometry,
- the Core Graphics framework (and Quartz to some extent),
- a storyboard,
- a storyboard scene,
- a UIViewController in code,
- subclassing a UIViewController in code,
- a UIViewController in a storyboard scene,
- the backing UIViewController subclass for a UIViewController in a storyboard scene,
- points versus pixels,
- a CGRect,
- Auto Layout — especially understanding basic constraints,
- blocks/closures, and,
- threading/concurrency.
IMPORTANT: We’ll refer to Figures 1, 2, 3, 4, 5, 6, 7 and 8 shown below while answering questions.
- Question: What are UIView bounds?
- Answer: The bounds of a UIView (the big blue one in Figure 1 and Figure 2) are its origin (x,y) and size (width, height) as they pertain to the UIView itself, in its own coordinate system located at (x,y) = (0,0). Call them relative to the view itself coordinates or independent. Bounds can help you decide where a UIView can fit in a superview. They can help you decide what sized subviews fit inside your UIView’s bounds, where you can situate those subviews, and how to arrange those subviews.
- Question: What are UIView frames?
- Answer: The frame of a UIView (the big blue one in Figure 1 and Figure 2) are its origin (x,y) and size (width, height) as they pertain to the UIView’s owner or “superview,” in this case the whole device’s window that contains the UIView. From the perspective of the iPhone 7’s window (superview), the (x,y) = (67,213). Call them relative to the view’s owner coordinates or dependent. The frame helps you decide if a UIView fits in its parent view and where to place it.
- Question: What is UIView geometry?
- Answer: Apple has an article entitled “View Geometry” which I quote from below. It goes into much greater detail than I do herein, but the answers I’ve given to Question 1 and Question 2 should be more than enough to get you started.
A view is responsible for the drawing and event handling in a rectangular area of a window. In order to specify that rectangle of responsibility, you define its location as an origin point and size using a coordinate system. This chapter describes the coordinate system used by views, how a view’s location and size is specified, and how the size of a view interacts with its content. …
- Question: What are the Core Graphics framework and Quartz?
- Answer: The Core Graphics framework is an interface/API and assets you’ll use for drawing/display in iOS apps. It contains the classes, methods/functions, constants, types, etc., like CGRect, CGFloat, CGColor, we used to create, display, and animate UIView’s in this series. It’s for drawing things like points, lines, rectangles, circles, and gradients. “Quartz 2D is a two-dimensional drawing engine” and the “Core Graphics framework is based on the Quartz advanced drawing engine.” Right now, you don’t need the details, you just need to be aware of these technologies. Note: “A framework is a hierarchical directory that encapsulates a dynamic library, header files, and resources, such as storyboards, image files, and localized strings, into a single package. Apps using frameworks need to embed the framework in the app’s bundle.”
- Question: What is a storyboard? What is a UIViewController in a storyboard scene?
- Answer: Use storyboards when developing your apps (XIB’s are necessary sometimes, and so is programmatically creating UI components; you can see arguments for each option here). Storyboards are a great visual aid in terms of organizing your app, and Interface Builder is a great tool for designing complex and elegant user experiences.
In the movie making industry, storyboards are used to plan out all the individual scenes, show the sequence of the scenes, and show the relationships between scenes, i.e., “the movie starts at scene 1, then we perform scene 2, then we perform scene 3…” Storyboards are generally drawn out by hand on large pieces of paper or poster board. They define the actors required in each scene, and the actions and dialogue by/between the actors. It’s quite the same in an iOS app. Think of the actors as buttons, views, sliders, text fields, and think of the decision to lead from one scene to another as a segue. According to Apple:
A complete iOS app is composed of multiple views through which the user navigates. The relationships between these views [view controllers or scenes] are defined by storyboards, which show a complete view of your app’s flow. Interface Builder’s storyboard designer makes it easy to create and design new views, and chain them together to create a complete user interface that’s ready for your custom code.
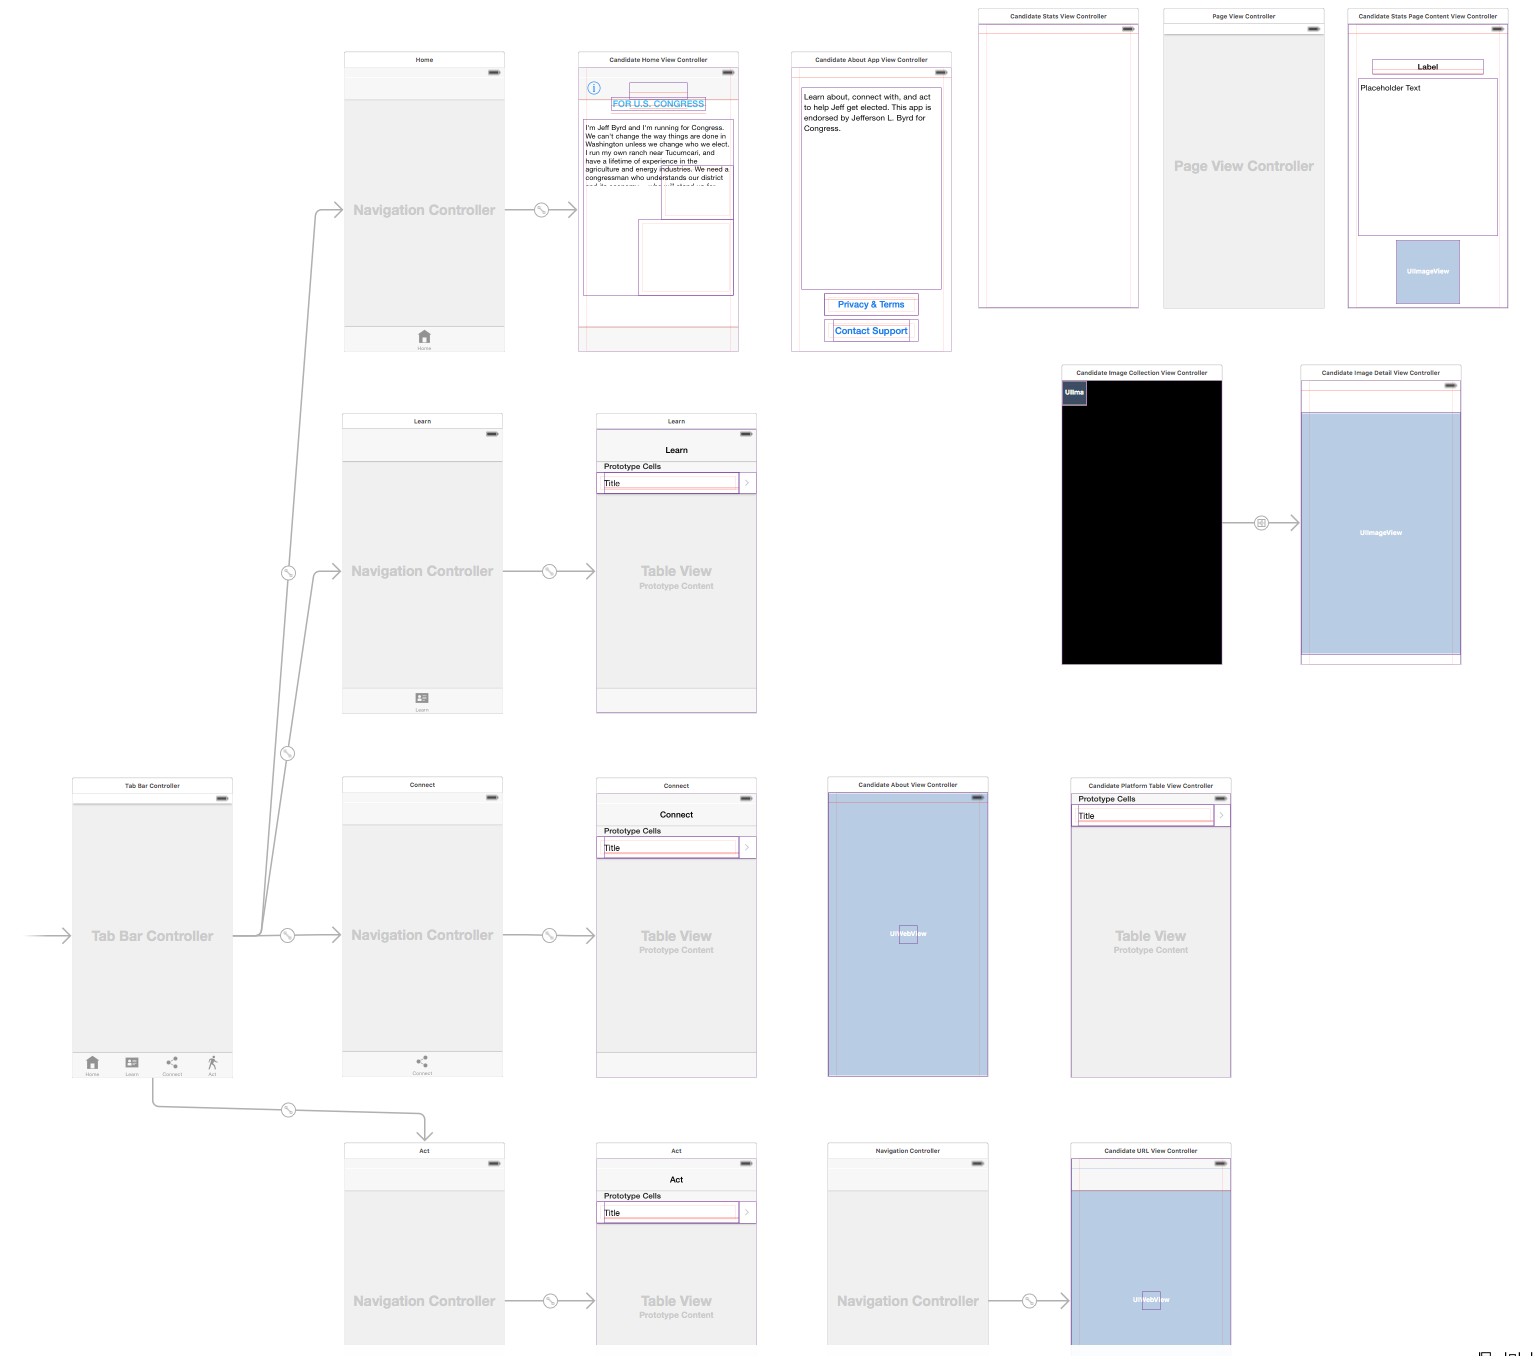
Xcode includes storyboard controllers [scenes] for:
- Table View Controller
- Collection View Controller
- Navigation Controller
- Tab Bar Controller
- Page View Controller
- GLKit View Controller
- Or build your own
Check out most of the storyboard for my first App Store app below (click to jump to it).
- Question: What is a storyboard scene? What is a UIViewController in a storyboard scene?
- Answer: A scene, just like in the movies, should be a finite, well-defined unit of meaning, visual display, actors, interactions between actors, and functionality. Take our storyboard scene for animating a UIView. The scene itself is a UIViewController. The actors are two UIView’s and a UIButton. The interactions/functionality: pressing the UIButton causes a new red UIView to be programmatically added to the big blue UIView, and then the red UIView animates. See the video above and Figure 5 below.
- Question: What is a UIViewController in code? What is the backing UIViewController subclass for a UIViewController in a storyboard scene?
- Answer: Dragging a UIViewController, UITableViewController, or UICollectionViewController (scene) into a storyboard is a start, but won’t get you too far. In order for that UIViewController/scene to become active in your movie/app, you need to create what’s often called a “backing” UIViewController (subclass) in code for your storyboard UIViewController. Then you can connect actors in your scene into code via IBOutlets and access the actors’ properties, like color, size, text, width, and height. You can also connect actors in your scene into code via IBActions and make the actors do things — like making a tap on the “Animate” button start animating the small red UIView (see video).
When I created my UIViewController storyboard scene for the “Animation Demo” Xcode project, I then created a UIViewController subclass code file and associated them together. See Figure 6 below. Next, I created IBOutlets and IBActions and started coding in Swift 3.0 to make my animations happen (see source code below).
- Question: What are points versus pixels?
- Answer: You may have noticed that in my view geometry for creating the animation, I specified screen coordinates such as “(x,y) = (67, 213) and (width, height) = (240,240.0)”. My “Animation Demo” will execute on any iPhone capable of running iOS 10 and my design will size proportionally — and I can use the same numbers despite the fact that these iPhones have different scene sizes. Why? Points are independent of pixels, but still have spacial meaning. From Apple:
…In iOS there is a distinction between the coordinates you specify in your drawing code and the pixels of the underlying device. When using native drawing technologies such as Quartz, UIKit, and Core Animation, the drawing coordinate space and the view’s coordinate space are both logical coordinate spaces, with distances measured in points. These logical coordinate systems are decoupled from the device coordinate space used by the system frameworks to manage the pixels onscreen.
The system automatically maps points in the view’s coordinate space to pixels in the device coordinate space, but this mapping is not always one-to-one. This behavior leads to an important fact that you should always remember:
One point does not necessarily correspond to one physical pixel.
The purpose of using points (and the logical coordinate system) is to provide a consistent size of output that is device independent. For most purposes, the actual size of a point is irrelevant. The goal of points is to provide a relatively consistent scale that you can use in your code to specify the size and position of views and rendered content. How points are actually mapped to pixels is a detail that is handled by the system frameworks. For example, on a device with a high-resolution screen, a line that is one point wide may actually result in a line that is two physical pixels wide. The result is that if you draw the same content on two similar devices, with only one of them having a high-resolution screen, the content appears to be about the same size on both devices. …
- Question: What is a CGRect?
- Answer: A CGRect is a “A structure that contains the location and dimensions of a rectangle,” according to Apple. Whenever you create a UIView in code, you’ll almost always pass a CGRect to the UIView’s init parameter. And guess what, when creating circular, rectangular, or other shaped UIView’s, you’ll start with a CGRect (this is a more advanced topic). See Figure 1 and Figure 2.
- Question: What is Auto Layout — and especially what are constraints?
- Answer: This is also an advanced topic, but you don’t want to develop iOS apps without understanding and using Auto Layout. You can create one elegant user interface design that will run on multiple Apple devices with different screen sizes and in different orientations. This is a bit of an over-simplification, as you may have to get into things like Adaptive Auto Layout and trait collections as your designs become more complex, but you don’t have to worry about those now.
Let’s consider a simple example from my “Animation Demo”, considering what Apple calls the “Anatomy of a Constraint:”
The layout of your view hierarchy is defined as a series of linear equations. Each constraint represents a single equation. Your goal is to declare a series of equations that has one and only one possible solution. …
Try to do this on your own. In Main.storyboard, accept the default Auto Layout Device of “View as: iPhone 7 (wC hR)”. Drag a UIView from the Object Library onto your only UIViewController scene. Click the Size Inspector and set the UIView’s Width and Height to 240 and 240 points, respectively, to get a perfect square. Select the UIView and set Auto Layout constraints for the UIView as follows:
- Align: Horizontally in Container
- Align: Vertically in Container
Select the UIView again and control-drag diagonally from the lower left side to the upper-right side. In the context menu that pops up, set constraints as follows:
- Width
- Height
- Aspect Ratio
If I wouldn’t have set the previous three constraints, the UIView would not have an Intrinsic Content Size — it’s width and height would be 0 and 0 points, respectively, and it wouldn’t be visible.
See Figure 8, a picture of Interface Builder showing the constraint equations.
- Question:What are blocks/closures?
- Answer: This is an advanced topic. Suffice it to say that using blocks is one of the easiest means of animating in iOS — as I did in Figure 7. Let me just quote a definition from AppCoda:
… a block is a self-contained, autonomous code fragment, existing always into the scope of another programming structure, as for example the body of a method. The code on the block can “interact” with the world out of it, but what takes place in the block is not visible to the scope out of it. Also, blocks can modify the values of variables being out of its body using a special way (we’ll see more later). Blocks have two great features:
- They can be executed in a later time, and not when the code of the scope they have been implemented is being executed.
- Their usage leads eventually to a much cleaner and tidier code writing, as they can be used instead of delegate methods, written just in one place and not spread to many files. …
- Question: What is threading/concurrency?
- Answer: This is an advanced topic, but one I cover in great detail in another post. Suffice it to say that generally speaking, you can — especially if your CPU has multiple cores — run multiple pieces (“threads”) of code at the same time. If you remember only one thing about threading from this series, remember this: When I wrote the “Animation Demo,” I made sure that I only updated the user interface on the main thread.
So there you have it friends. Read this article — and read posts 1, 2, 3, and 4 from this series — and you’ll be able to start developing iOS apps. You won’t just be groping blindly in the dark. I have carefully selected and discussed concepts that will start you on your way to be becoming not just a good iOS app developer, but a great one. Thanks!


|
1 2 3 4 5 6 7 8 9 10 11 12 13 14 15 16 17 18 19 20 21 22 23 24 25 26 27 28 29 30 31 32 33 34 35 36 37 38 39 40 41 42 43 44 45 46 47 48 49 50 51 52 53 54 55 56 57 58 59 60 61 62 63 64 65 66 67 68 69 70 71 72 73 74 75 76 77 78 79 80 81 82 83 84 85 86 87 88 89 90 91 92 93 94 95 96 97 98 99 100 101 102 103 104 105 106 107 108 109 110 111 112 113 114 115 116 117 118 119 120 121 122 123 124 125 126 127 128 129 130 131 132 133 134 135 136 137 138 139 140 141 142 143 144 145 146 147 148 149 150 151 152 153 154 155 156 157 158 159 160 161 162 163 164 165 166 167 |
// // ViewController.swift // Animation Demo // // Created by Andrew Jaffee on 1/7/17. // Copyright © 2017 microIT Infrastructure, LLC. All rights reserved. // import UIKit class ViewController: UIViewController { // our main drawing view ("canvas" if you like); this is the // one we created in the storyboard @IBOutlet weak var mainSubView: UIView! // the view we'll animate; to keep the code simple, I'm // forcibly unwrapping this view instead of using an optional or // creating an init for the UIViewController var animateView: UIView! // to make the animatable view look nice, we offset it // from the main canvas view let animateViewMarginToMain: CGFloat = 10.0 // this is the initial width and height of the // view we'll animate; initially, it is relatively small compared // to the canvas view let animateViewWidth: CGFloat = 50.0 let animateViewHeight: CGFloat = 50.0 // instantiate the variables that will define a // new width and height for the subview we'll animate var animateViewNewWidth: CGFloat = 0.0 var animateViewNewHeight: CGFloat = 0.0 // MARK: - User interactions /** When the user taps the "Animate" button, we... animate the initially small view that we added to the canvas view in viewDidLoad */ @IBAction func animateButtonTapped(_ sender: Any) { // I want the initially small view to grow until it almost fills // the canvas view; I keep the margins of the subview the same // on top, bottom, right, and left. animateViewNewWidth = mainSubView.bounds.width - animateViewMarginToMain*2.0 animateViewNewHeight = mainSubView.bounds.height - animateViewMarginToMain*2.0 // display the calculation for making the subview grow but staying // within the canvas view, with a nice consistent margin print("animateViewNewHeight/Width: \(mainSubView.bounds.width) - \(animateViewMarginToMain*2.0) = \(animateViewNewWidth)") // show the bounds and frame of the canvas view and animatable subview // BEFORE the animation printCGRects() // "Animate changes to one or more views using the specified // duration, delay, options, and completion handler." UIView.animate(withDuration: 2.0, delay: 2.0, options: UIViewAnimationOptions.curveEaseIn, animations: { // This is the FIRST animation. This will make the subview // appear -- fading into visual appearance self.animateView.alpha = 1.0 }) { (completed:Bool) in // This block is executed after the FIRST animation completes. if (completed) // Only proceed if the FIRST animation succeeds. { // This is the SECOND animation block. UIView.animate(withDuration: 2.0) { // According to Apple, the frame is one of the "Animatable UIView properties" // and we can "Modify this property to change the view’s size and position // relative to its superview’s coordinate system." self.animateView.frame.size.width = self.animateViewNewWidth self.animateView.frame.size.height = self.animateViewNewHeight // show the bounds and frame of the canvas view and animatable subview // AFTER the animation self.printCGRects() } } // end if } // end completion block } // end func animateButtonTapped // MARK: - UIViewController delegate override func viewDidLoad() { super.viewDidLoad() // Create a subview in our main drawing view on app startup configureAnimateView() } override func didReceiveMemoryWarning() { super.didReceiveMemoryWarning() } override func viewDidAppear(_ animated: Bool) { super.viewDidAppear(animated) } // end func viewDidAppear // MARK: - Subview setup /** Create a subview in our main drawing view; initially, hide the subview */ func configureAnimateView () -> Void { // Create the CGRect which defines the geometry of the subview to animate // DO I NEED TO ADD THE mainSubView.bounds.origin.x AND y HERE??? let animateViewRect = CGRect(x: animateViewMarginToMain + mainSubView.bounds.origin.x, y: animateViewMarginToMain + mainSubView.bounds.origin.y, width: animateViewWidth, height: animateViewHeight) // Create the subview based on the CGRect animateView = UIView(frame: animateViewRect) // Make the subview red so it is easily identifiable in animation animateView.backgroundColor = UIColor.red // Initially hide the subview so that we can animate it // onto the main canvas view animateView.alpha = 0.0 // WE MUST add the new subview to the main canvas view mainSubView.addSubview(animateView) } // end func configureAnimateView // MARK: - Helper method(s) /** Display bounds and frame definitions for views we're working with */ func printCGRects() -> Void { print("----------------------------------------") print("mainSubView frame: \(mainSubView.frame)") print("mainSubView bounds: \(mainSubView.bounds)") print("animateView frame: \(animateView.frame)") print("animateView bounds: \(animateView.bounds)") print("----------------------------------------") } /** Remove all subviews from main drawing/animation view */ func removeSubviews() -> Void { for subView in mainSubView.subviews { subView.removeFromSuperview() } } } // end class ViewController |
Figure 7. ViewController subclass of UIViewController.

Hello Sir,
Just want to thankyou for your amazing posts. And also I want to request you please post an article related to how the proper documentation should be done for ios applications.
I wrote a post entitled “Xcode secrets: save time with context-sensitive help and documentation,” https://iosbrain.com/blog/2017/02/04/xcode-secrets-save-time-with-context-sensitive-help-and-documentation/, which explains how you can add context-sensitive commentary to your own code.