Creating a new Git/GitHub repository for your Xcode project — a detailed tutorial

Let’s talk about source/version control, why it’s so important, and how you can easily put all your iOS code under source/version control management (SCM). I’m going to show you the manual steps involved in putting your code into a Git SCM “repository” (repo) so you fully understand how source/version control works. Jump straight to the tutorial if you’re already familiar with the concept of source control. I can’t explain everything about SCM in one blog post, but I’ll get you started and provide many online resources for you to reference. Why am I using Git? Like it or not, Git has become the de facto standard in SCM systems, mainly because it “is a free and open source [and] distributed version control system.” I don’t buy into the “Git is easy to learn” argument. I find Git to be overly complicated, cryptic, and generally requiring more steps to accomplish source control tasks than say centralized SCM systems like TFS or Subversion/SVN. Git does have some advantages over other SCM products, and it even becomes quite efficacious once you pay your dues learning how to use it properly.

Continue reading “Creating a new Git/GitHub repository for your Xcode project — a detailed tutorial”

UPDATE: Renaming an Xcode 8 project, the easy way or the advanced way

NOTE: This article was first published on Jan 18, 2017. Since that time, I realized I missed one aspect of the project renaming process. Re-read the article or jump straight to the new content.

Sometimes you need to rename your Xcode projects. Not too long ago, this would’ve been problematic. Apple has built a project renaming feature into Xcode, but it’s not good enough for my needs. I’ll show you how I have to go above and beyond the standard functionality to get what I really want. Let’s walk through a concrete example, renaming an Xcode project we’ve been talking about in the post entitled “The UICollectionView is much more than a grid or matrix”.

Continue reading “UPDATE: Renaming an Xcode 8 project, the easy way or the advanced way”

Oh, my – App Transport Security has blocked a cleartext HTTP (https://) resource load since it is insecure

App Transport Security (ATS) is enabled by default for apps linked against the iOS 9.0 or OS X v10.11 SDKs or later, as indicated by the default Boolean value of NO for the NSAllowsArbitraryLoads key. This key is at the root level of the NSAppTransportSecurity dictionary.

With ATS enabled, HTTP connections must use HTTPS (RFC 2818). Attempts to connect using insecure HTTP fail. ATS employs the Transport Layer Security (TLS) protocol version 1.2 (RFC 5246). For background on secure Internet connections, read HTTPS Server Trust Evaluation.

Apple, Information Property List Key Reference

With the advent of iOS 9, Apple decided that developers should avoid accessing insecure, unencrypted clear text HTTP (https://) resources on the Internet. Today I’ll show you how to access HTTP sites/services in your apps. I’ll explain the special hoops that Apple wants you to jump through just to use HTTP — and help you keep your app from being rejected.

For Apple to assume that anything HTTP is dangerous is a bit overboard as there are legitimate reasons to access a resource via clear text, like downloading an image (clear binary). Grabbing an image won’t reveal information about users’ private lives. A web/REST service that consumes someone’s name and Social Security number is a different story — that info must be encrypted.

Fortunately, Apple has made some accommodations in allowing continued use of HTTP as long as you provide “justification” when submitting your apps.

Continue reading “Oh, my – App Transport Security has blocked a cleartext HTTP (https://) resource load since it is insecure”

Xcode secrets: save time with context-sensitive help and documentation

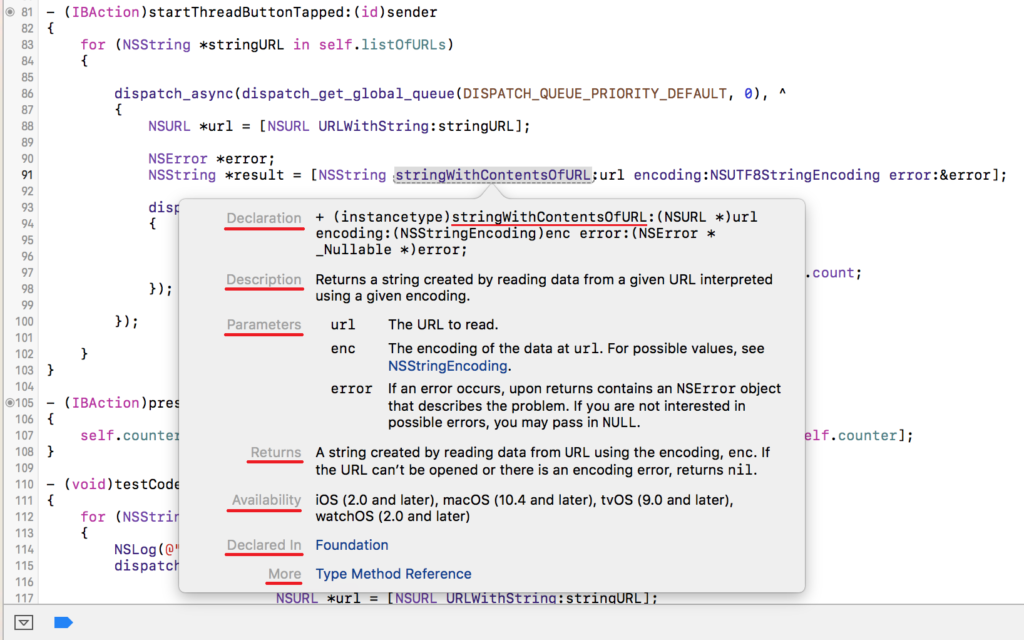
How many times have you been looking at Swift or Objective-C code in Xcode and can’t remember what a framework method, argument, constant, etc. means? Did you know that help — full documentation — is just a keystroke away? Did you also know that you can add the same type of pop-up, context-sensitive help to your own code? Here’s how. Let’s say you’re looking at the following NSString class method and can’t remember exactly what the call does, what parameters it takes, and what is its return value:

Highlight the method name, parameter, even the enum, and then press the following key combination on your keyboard:

[command] + [control] + [shift] + [?]

      or, using key symbols:

⌘ ⌃ ⇧ ?

Here’s what you’ll see: a context-sensitive help/documentation popup. Note that I added the red lines to highlight content. The red highlighting is not what Xcode provides (click to enlarge):

Figure 1: Xcode framework context sensitive help and documentation.

So you immediately get information about the method, parameter, enum, even constant’s:

  • Declaration (formal language signature);
  • Description (textual explanation of the entity’s purpose);
  • Parameters (a full list of names and definitions);
  • Returns (the value returned by a method/function, if applicable);
  • Availability (what version of iOS that the entity became available in — and sometimes in what version it was deprecated);
  • Declared In (the framework which contains the entity); and,
  • More (generally, the formal definition of the entity with explanations and other links).

Check out what I get if I click on the “More Type Method Reference” link as shown in Figure 1 (click to enlarge):

Continue reading “Xcode secrets: save time with context-sensitive help and documentation”

Using Swift extensions to manage complexity, improve readability, and increase extensibility (UICollectionView, protocols, and delegates)

[Download the full Xcode project from GitHub.]

Today, I’m going to show you how to leverage the Swift “extension” language feature to manage software complexity, improve code readability, and increase extensibility. We’ll also talk about delegates, data sources, and protocols as they are concepts essential to this tutorial. According to Apple’s “The Swift Programming Language (Swift 3.0.1):”

Continue reading “Using Swift extensions to manage complexity, improve readability, and increase extensibility (UICollectionView, protocols, and delegates)”

Troubleshooting Auto Layout using Xcode’s Debug View Hierarchy

What’s more important when troubleshooting software, 1) what you intended in design or 2) what was materialized by running your code in a production environment? Take Auto Layout for example. Interface Builder may be happy with your constraints, displaying no warnings or errors, but when you run your app, you see problems. I find it much more helpful to see my all my Auto Layout live, while my app is running. I’ve found that using Xcode’s Debug View Hierarchy button is an often over-looked but extremely powerful tool for solving app layout problems, especially when iOS developers have to write app user interfaces that run on differently-sized devices in multiple orientations. The Debug View Hierarchy feature helps you understand how Auto Layout works. You can see all of your app’s:

Continue reading “Troubleshooting Auto Layout using Xcode’s Debug View Hierarchy”

Renaming an Xcode 8 project, the easy way or the advanced way

NOTE: This article was first published on Jan 18, 2017. Since that time, I realized I missed one aspect of the project renaming process. Re-read the article or jump straight to the new content.

Sometimes you need to rename your Xcode projects. Not too long ago, this would’ve been problematic. Apple has built a project renaming feature into Xcode, but it’s not good enough for my needs. I’ll show you how I have to go above and beyond the standard functionality to get what I really want. Let’s walk through a concrete example, renaming an Xcode project we’ve been talking about in the post entitled “The UICollectionView is much more than a grid or matrix”.

Continue reading “Renaming an Xcode 8 project, the easy way or the advanced way”

iOS 101 or … Basic animation, Auto Layout, and view geometry – Part 5

[Download the full Xcode project from GitHub.]

Today, I’m going answer all the questions I posed in this series of posts entitled “Basic animation, Auto Layout, and view geometry – Part X” (see parts 1, 2, 3, and 4). I’ll help you understand how how I created the following iPhone animation using Swift 3.0 — and/or how to get started with your first iOS app:

Continue reading “iOS 101 or … Basic animation, Auto Layout, and view geometry – Part 5”

Basic animation, Auto Layout, and view geometry – Part 2

[Download the full Xcode project from GitHub.]

In this series of posts, “Basic animation, Auto Layout, and view geometry – Part X,” we’re learning about basic animation in several steps. In yesterday’s post, “Basic animation, Auto Layout, and view geometry – Part 1” we covered setting up a storyboard scene using Auto Layout. Today, we’ll be using some basic UIView geometry to play with shapes and sizes. Tomorrow, we’ll be writing the code to explore iOS animation capabilities. I’ll be writing code in Swift 3.0, then later providing Objective-C versions. I’ll make all the source code available to y’all on GitHub as we move forward.

NOTE: The iOS skill level required herein is “beginner” to “intermediate.” One of the purposes of this blog is to help aspiring new iOS developers get started on the right foot. For all you seasoned (or “advanced”) developers out there, I encourage you to stick with this blog as we’ll be covering very complex iOS scenarios too. Everyone can benefit from these articles, including myself, by getting your feedback.

So what’s this stuff I call “basic UIView geometry?” All user interface components, like UIView’s and UIButton’s, must be positioned on an Apple device’s screen. They’re also objects that occupy space, so they have width and height. In order to position user interface components properly on screen, you use Auto Layout, which boils down to a series of geometric equations called “constraints.” According to Apple, “The layout of your view hierarchy is defined as a series of linear equations. Each constraint represents a single equation. Your goal is to declare a series of equations that has one and only one possible solution.” Let’s make this all more concrete and define two terms you’ll always need to know.

Continue reading “Basic animation, Auto Layout, and view geometry – Part 2”

Basic animation, Auto Layout, and view geometry – Part 1

[Download the full Xcode project from GitHub.]

We’re going to learn about basic animation in the next few series of posts, “Basic animation, Auto Layout, and view geometry – Part X.” In order to perform animations, we need to lay the foundation for a simple app. We’ll be 1) setting up a storyboard scene using Auto Layout (this post), 2) using some basic UIView geometry to play with shapes and sizes (Part 2), and 3) writing the code in Swift and Objective-C to explore iOS animation capabilities (Part 3). After Part 3, we’ll start solidifying all the concepts you’ve learned in this series, tie all these concepts together, and come to the realization that these concepts will be indispensable in almost all your iOS development efforts. I’ll make all the source code available to y’all on GitHub as we move forward.

NOTE: The iOS skill level required herein is “beginner” to “intermediate.” One of the purposes of this blog is to help aspiring new iOS developers get started on the right foot. For all you seasoned (or “advanced”) developers out there, I encourage you to stick with this blog as we’ll be covering very complex iOS scenarios too. Everyone can benefit from these articles, including myself, by getting your feedback.

Create a new Xcode 8.x project, selecting a Single View Application, naming the project “Animation Demo,” filing out all the required new project fields, selecting “Swift” as the Language, and setting “iPhone” for Devices.

Continue reading “Basic animation, Auto Layout, and view geometry – Part 1”