Downloading and installing an old version of OS X (mac OS) on your Mac

We’re going to talk about installing a version of your Mac’s operating system (OS), known as “macOS” or “OS X,” on your Mac, older than the one you’re currently running, on a partition of your primary hard drive or on an external hard drive. You may find that your current instance of OS X is too unstable for normal day-to-day usage or more heavy-duty tasks like development. Remember all the problems people had when they upgraded to OS X 10.13, also known as “High Sierra?” Oy, vey. You might have been like “Get me the heck outta Dodge!” You wanted or needed to get back to a stable OS, like Sierra (OS X 10.12) or El Capitan (OS X 10.11). For developers, you may have to install an older version of Xcode not supported by your latest OS. For Cocoa/macOS developers, you may need to make absolutely sure that your desktop apps are backward compatible, and the only way to do that for sure is to install and run your apps on older versions of macOS. I will show you, step by step, how to get a valid copy of an older version of macOS, make a bootable installer disk, and install the old OS.

Continue reading “Downloading and installing an old version of OS X (mac OS) on your Mac”

Xcode: using the “Debug executable” checkbox to step through app release versions

Here’s an Xcode setting, but what does it do for developers?

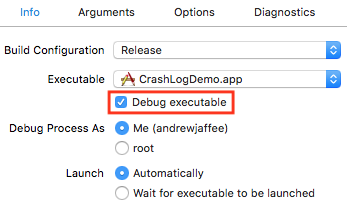
There’s a checkbox named “Debug executable” on the “Info” pane for Xcode’s “Debugging Options in the Scheme Editor.” Why is there such a dearth of information on this checkbox, a “simple” Xcode scheme option? Apple has little to say about the feature. Information about it is scarce on the web. I’ve heard all sorts of different opinions about what the checkbox does or doesn’t do. (Some of this may be exacerbated by Apple releasing buggy versions of Xcode.)

I’ll discover and explain, using the scientific method, how the “Debug executable” checkbox works. You may be thinking this is much ado about one checkbox, but my purpose is to get you to think about and learn a lot about debugging with Xcode. The absolute best developers are the ones with great and instinctive debugging, nay, TROUBLESHOOTING, skills.

Continue reading “Xcode: using the “Debug executable” checkbox to step through app release versions”

Debugging: symbolicating crash reports manually (stack trace, backtrace)

Swift tutorials by iosbrain.comToday, we’ll talk about manually symbolicating iOS and OS X application “crash reports.” Why? When you hear about a crash in one of your apps from a customer, the first thing you should do is try to get a copy of the crash report. But there are times when you get crash reports that aren’t automatically symbolicated, or that you can’t symbolicate by dragging into Xcode, or are partially symbolicated. When not symbolicated, you’re reading numeric addresses when you want to be reading code, like your function/class names. There are workarounds and we’ll discuss one today. Download the sample Xcode 9 project written in Objective-C to follow along. What’s a crash report, anyway? According to Apple:

Continue reading “Debugging: symbolicating crash reports manually (stack trace, backtrace)”

Xcode tidbits: Open as Hex, Open As Source Code, (Git) line endings, and text encoding

With this article, I’m starting a series about all the goodies — useful tools — that can be found in Xcode. Some of these tidbits are tools everyone knows about while others are barely documented to undocumented. For example, how many of you know that you can view, inspect, and debug all your Auto Layout constraints live during app execution using the “Debug View Hierarchy” Xcode feature? I discussed that feature in detail in this article, “Troubleshooting Auto Layout using Xcode’s Debug View Hierarchy.” Today, we’ll discover two editors that ship with Xcode, the “Open As > Hex” and “Open As > Source Code” editors, both only available by right-clicking on files in the “Project Navigator” to reveal a contextual menu.

Continue reading “Xcode tidbits: Open as Hex, Open As Source Code, (Git) line endings, and text encoding”

Building Swift 4 frameworks and including them in your apps (Xcode 9)

Let’s talk about Swift 4 frameworks, one method for packaging, reusing, and sharing code. We’ll build our own framework and then include it in our own app. We could’ve talked about static libraries, but frameworks offer more advanced features — and will let us expand on code maintainability options in future discussions. (If you want to have that static versus dynamic library discussion, read this excellent article, but we won’t be debating the topic herein.) From Apple (my emphasis added):

Continue reading “Building Swift 4 frameworks and including them in your apps (Xcode 9)”

Typical Git/GitHub workflow tutorial: configure, clone, commit, stage, push, pull, status

Introduction

Suppose your supervisor or customer gives you a new project to work on: “I want you to start helping out on my iOS project, ‘Blocks-in-Objective-C.’ Please get a copy of the code, make these changes, test, and then check your new code into the repo. By the way, we’re using Git for source control.” Have you used Git before? Do you know it well? (Does anyone truly understand Git?) Today, I’ll show you how to accomplish that task just assigned by your supervisor or customer.

Requirements

Since this is an iOS blog, I’m assuming you’ve installed Xcode and therefore Git is installed on your Mac. (If you need to install Git, click here.)

Continue reading “Typical Git/GitHub workflow tutorial: configure, clone, commit, stage, push, pull, status”

Polymorphism in Swift 3: manipulate multiple related controls with one IBOutlet and one IBAction

How would you enable or disable multiple user interface controls using one IBOutlet and one IBAction? For example, you might need to disable a UITextBox and UISegmentedControl because a user’s login has expired. Perhaps a user hasn’t filled in some required fields on a form, so you want to disable several buttons. Watch the following video to see how I built a Swift 3 app to use a UISwitch to enable or disable four controls all at one time — and I demonstrated the object-oriented programming (OOP) principle of polymorphism:

Refresh your memory about OOP and inheritance.

Continue reading “Polymorphism in Swift 3: manipulate multiple related controls with one IBOutlet and one IBAction”

Simple data persistence in iOS using Swift 3 (think user preferences)

[Download Xcode 8.2.1 project with full Swift 3 source from GitHub.]

Today, we’ll cover the topic of storing a user’s “default settings” inside your app — not forcing the user to go to a Settings bundle. The key to doing this is to save the user’s preferences to a persistent store whenever the user changes those preferences (or at least when the app goes into the background, but definitely before the app is terminated). But saving/writing those preferences is not enough. You must also read those preferences from the persistent store every time the app opens so that the user will always see their default settings. User settings/preferences must be synchronized with the persistent store.

I’m talking about saving simple pieces of data, like a user’s preferences for the background color of views, preferred language (i.e., English, Hindi, Portuguese, Spanish), preferred measuring units (metric or English), etc. Apple’s Human Interface Guidelines don’t explicitly forbid in-app settings. In fact, they explicitly permit them:

Note: Apps are not required to use a Settings bundle to manage all preferences. For preferences that the user is likely to change frequently, the app can display its own custom interface for managing those preferences.

Continue reading “Simple data persistence in iOS using Swift 3 (think user preferences)”

Swift 3 segues, unwind segues, storyboards, and view/navigation controllers

[Download Xcode 8.2.1 project with full Swift 3 source from GitHub.]

Today’s tutorial covers transitions — segues — from one source storyboard scene to another destination scene, and unwind segues leading back from destination to source… I created a project to help you follow along with this tutorial, written in Swift 3, against the iOS 10 SDK, and using the Xcode 8.2.1 IDE. Please download the project. The app produced by the project is shown in action in the following video. Please watch before continuing on:

Segues don’t exist in a vacuum. I’ve introduced a UINavigationController into the mix. Of course, you’ll see a few UIViewControllers. I’ve also used a UITableView and managed its complexity by breaking it into logical pieces by using Swift “extensions.” As you proceed, you’ll have to grasp concepts like Auto Layout and managing a table view’s data source.

Continue reading “Swift 3 segues, unwind segues, storyboards, and view/navigation controllers”

Swift 3, iOS 10, Xcode 8: finding, adding, and removing IBOutlets

I’m going to show you how you can create IBOutlets, find your existing ones, and delete them. There will be times when you need to delete outlets, for example, if you connected the wrong component, have to change your design, misspelled an outlet, etc. You can’t do iOS without doing IBOutlets. An outlet is a connection you must create to allow your user interface (UI) to communicate with your code. For example, if you have a UIView on a storyboard scene, like a UIViewController, you may want to change that view’s background color during app execution. You may also need the bounds or frame of the view. If you have a UIButton, you may want to dynamically enable or disable it depending on some runtime condition. Say you have two UITextFields, “username” and “password,” and a UIButton containing the text “Login.” With IBOutlets, you could write your code so that the login button’s isEnabled property becomes true only when the username and password fields are filled with data. You would also want the text contained in the username and password fields once the user taps “Login.” IBOutlets form a connection between UI components like UILabel, UITextField, and UIView and their backing view controller that manages their behavior and presentation.

Continue reading “Swift 3, iOS 10, Xcode 8: finding, adding, and removing IBOutlets”